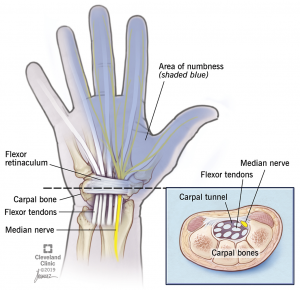
Carpal tunnel syndrome is the most common compressive neuropathy and accounts for roughly 90% of all compressive neuropathies. This condition is often associated with medical and mechanical risk factors. Risk factors include but are not limited to genetic predisposition, obesity, some endocrine and autoimmune disorders, pregnancy or repetitive motions.
In the case of carpal tunnel, the transverse carpal ligament (also known as the flexor retinaculum) becomes thickened. This ligament sits on top of the median nerve which provides motor and sensory function to the thumb, index, middle and radial half of the ring finger. If the nerve becomes compressed by the thickened transverse carpal ligament, sensory changes such as tingling or numbness in the above fingers or motor changes such as weakening grip strength and atrophy of the thenar muscles can occur.

After a thorough history and exam are conducted and carpal tunnel syndrome is thought to be the likely diagnosis, your provider will discuss further testing and treatment options for this condition. Often times, a nerve study called an electromyelogram and nerve conduction study (EMG/NCS) are ordered to ensure identification of the entrapped nerve. On occasion, a cervical (neck) impingement of a nerve can present similiar to a carpal tunnel syndrome. The EMG/NCS helps provide additional information to confirm the diagnosis.
After confirmation of the diagnosis, treatment options are discussed. These include:
If a carpal tunnel released is determined to be the best option, your provider will schedule this on an outpatient basis. This is performed through a 2 cm incision on the proximal palm of the hand. The transverse carpal ligament is released and the palmar fascia and skin are then closed. A soft dressing is applied and left in place for 48 hours after which the wound should be kept clean and dry. You may re-dress the wound with a bandaid to cover the wound. The patient may shower 72 hours after surgery but no submerging the wound in water (tubs/pools/dish water/etc.) until the wound is completely healed. There is generally no formal therapy required after surgery but the below protocol is given to the patient to follow and do at home. The goal of rehabilitation after carpal tunnel release is to allow for wound healing while still maintaining the function of the fingers and wrist. Heavy gripping is prohibited for 6 weeks to allow wound healing and to prevent palmar and pillar pain (pain in the palm).
Outcomes of carpal tunnel surgery are very successful in the majority of patients, but can depend on the severity and duration of symptoms. In some patients with long standing and more severe symptoms, the goal is to stop the progression of the neuropathy but with an understanding that some symptoms may persists for several months or may even be permanent. For example, 20% of patients with severe symptoms may have residual symptoms after surgery.